How to archive your emails

Read and write comments

Receive new posts via email

Have you ever received some useful information in an email and then lost that email? When is that party you were invited to? What is that new address? If you’re the one person on the planet who hasn’t done this let me tell you that it’s a jolly nuisance. Even if you do keep all your email on your computer, what happens to those emails when your hard drive dies or a meteor lands on your house?

I believe that the best option for storing, backing up, or archiving your emails is Gmail, for these reasons:

  • Google keeps several copies of your data in different places. If a meteor wipes out one data centre you should be okay.
  • There are no guarantees, but you’re very unlikely to lose data that’s stored with Google.
  • It’s free and you get lots of storage space (currently 10GB, and rising all the time).
  • You can access your emails from almost anywhere that has an internet connection (there’s a “basic HTML” option for slow connections).
  • Most email programs will let you search for emails by looking for a sender or a subject line. Gmail does that, and also lets you search the content of emails, which is invaluable. E.g., if you remember a phrase that was included in an email you can search for that.

It’s a three step plan

1) Set up a Gmail account: I prefer to have one that is used for archives and nothing else. Try appending your name with “archive”, e.g., if your name is Donald Duck you could try and get the email address donaldduckarchive@gmail.com.

2) Set up your email program so that when you send an email it automatically sends a BCC copy to your Gmail account. Using BCC means that your recipients will never see your Gmail address.

3) When you receive an email that you want to keep click Forward, then Send, and it will go to you Gmail archive. When you click Forward the email program will automatically add your Gmail address to the email and, optionally, you can add some keywords before clicking Send. E.g., if the email is about a particular person but does not mention that person by name you can add the name to help you later on when you do a search in Gmail. Alternatively, you could also add the topic of the email, e.g. “recipes” or “photography”.

Setting up BCC in Thunderbird

I’m not going to give instructions for every email program, but I am familiar with Thunderbird so I’ll cover that.

Click Tools > Account Settings > your email address > Copies & Folders. Ensure that “BCC these email addresses” is ticked and type in your Gmail address. Click OK and you’re all done.

Conclusion

There was a time when people kept all the letters they received from family members and this is the modern equivalent of that (if you do actually receive some physical mail that you want to keep just scan it and email it to your Gmail archive). I have used this system for several years and found that it’s simple and reliable.

Practical Computing


How to make photos hidden, viewable, and downloadable in Zenfolio

Read and write comments

Receive new posts via email

A friend of mine has his photos on a Zenfolio site and wants to make some new photos downloadable at no charge for parents. I presume that the parents will be more comfortable if the whole world can’t see the photos, so here’s some instructions for setting up a Zenfolio gallery (set of photos) that only people who have the gallery’s web address and password can access. Once they’re viewing the photos those people can put their mouse over the left hand side of any photo to download the photo or the whole set.

I have my photos on a Zenfolio site and I highly recommend the service. If you join up please use the referral code ZYQ-BU1-HSZ to get a discount and help me at the same time.

Step 1

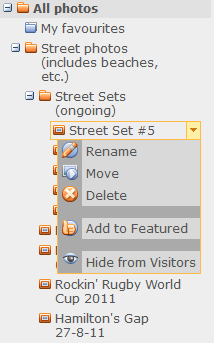
On the left hand side of the Zenfolio edit page create a new gallery, click on the triangle, and then click on “hide from visitors”. It will say “show to visitors” when it’s hidden. This means that your commercial site won’t be cluttered up with personal stuff.

Step 2

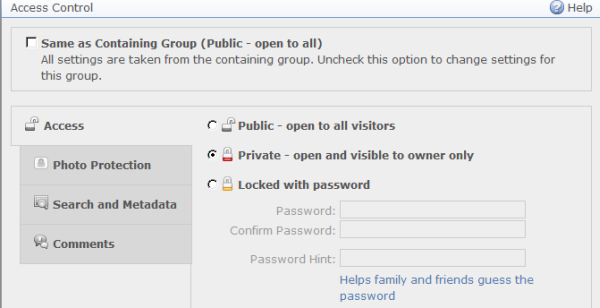
On the right of the Zenfolio page click Edit under Access Control.

Untick “same as containing group”.

Click “locked with password” and type the password twice. If you enter a hint it will be visible to the parents.

Step 3

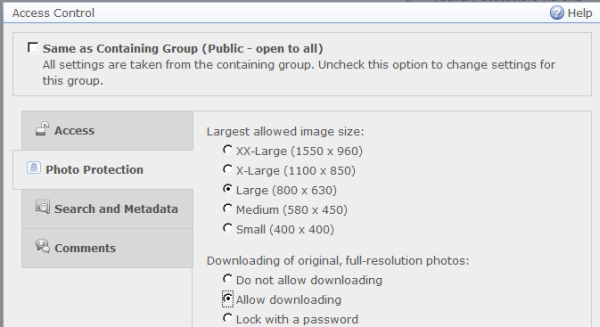
Select “allow downloading”

Step 4

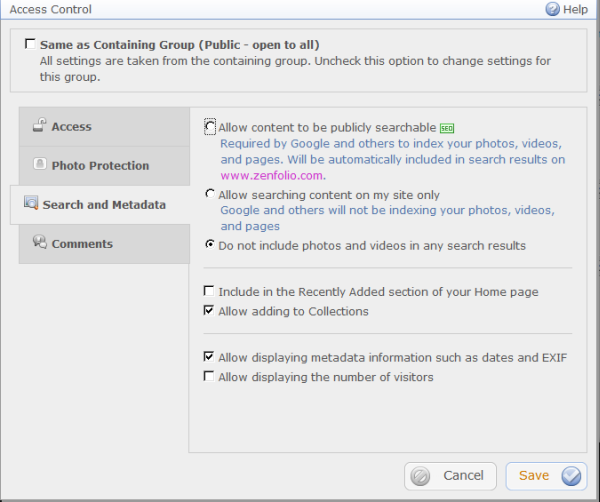
Click “Do not include photos and videos…”
Untick “Include in the Recently Added…”

Step 5

Click save, then on the right hand side of the edit window right click on the orange URL (the web address that starts with “http”). Select Copy Link Location (or something similar – it’s different in each web browser). Paste the URL into an email and send it, along with the password, to the parents after you’ve uploaded the photos.

What is the result of all this? Only people who have the web address and password can view the photos. Anyone who can view the photos can download them by putting their mouse over the left hand side of any photo.

Practical Computing


How to stop Facebook from sharing your location

Read and write comments

Receive new posts via email

Facebook’s treatment of privacy issues makes Google look benevolent. If you post from a mobile device readers will be able to see your location, and naturally Facebook didn’t ask if that was ok with you. Click here to learn how to disable this.

Practical Computing


How to check if a website is safe

Read and write comments

Receive new posts via email

I can’t embed the video, so click here to view it.

Practical Computing


How to stop photos disappearing from OpenOffice Impress

Read and write comments

Receive new posts via email

OpenOffice Impress (portable version) is freeware and similar to Microsoft Power Point. Impress will open and create Power Point files.

I found that when I dragged a photo from Free Commander (better than Windows Explorer and available in a portable version) onto an Impress presentation the photo would disappear if I later moved the photo to another folder or deleted it. What happened is that Impress created a link to the original file, so if I edited the photo the new version would automatically appear in my Impress presentation. This works well until you move or delete the original file.

You can prevent the photos from disappearing by breaking the link. Click Edit>Links (if Links is grayed out your presentation doesn’t have any), then click on the link that you want to break. If you want to break them all click on the top one then hold down Shift before clicking on the bottom one. Finally, click Break Link. Now all your photos and other linked files will stay in your presentation unless you open Impress and remove them yourself.

There is a way to prevent the automatic creation of links. In FastStone Viewer (portable version) I go to a full screen view of the photo that I want to add to my presentation. Then right click>Copy Image. Finally, I go to the relevant slide in Impress and right click>Paste or Ctrl+V.

If you’ve found this post helpful and/or it’s saved you some money please consider making a donation. Making a donation makes blogging a two way process: I scratch your back and you scratch mine 🙂

Practical Computing